Install mods at Minecraft
Besides plugins, mods offer a much greater freedom to modify the game. With mods you can easily add completely new creatures or blocks to the game.
What to do?
The standard Minecraft or vanilla Minecraft, as it is also known, does not offer any options to install mods. Thus, some precautions must first be taken so that the game can be modified by mods.
Likewise, mods must always be installed locally and on the server. Unlike plugins, they are only installed on the server.
Forge
The answer is usually 'Forge'. Forge must be installed locally as well as on the server and subsequently ensures that the game can be modified.
Client
To install Forge locally, i.e. on the client, the required file must be downloaded from files.minecraftforge.net.
- You must have Java installed on your computer to install Forge
- Search for the desired Minecraft version on files.minecraftforge.net
- Download the latest version by clicking the button
Installer- The latest version is usually listed at the top as
Download Latest.
- The latest version is usually listed at the top as
- Open the downloaded file (usually called
forge-VERSION-installer.jar) - In the opened window select
Install client, check the path and confirm withOK- The path must lead to your local Minecraft installation, Forge usually finds this out itself
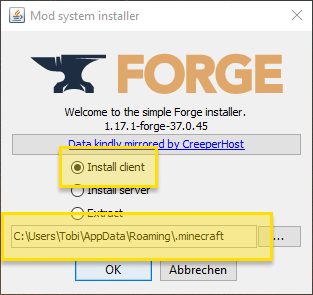
- The path must lead to your local Minecraft installation, Forge usually finds this out itself
- If the installation was successful a new window appears with
Successfully installed client profile forge ...- The installation will create a new Minecraft profile with the required files

- The installation will create a new Minecraft profile with the required files
- Now start the normal Minecraft launcher
- In your profiles/installations select the last created one e.g.
1.17.1-forge-37.0.45and start the game
Server
Next you need to install Forge on the server - similar to the client. It is important that you install the exact same Minecraft as well as Forge version.
Info: Some hosters already offer Forge as a 1-click installation. Check with your hoster and check the web interface if they offer this option, then you can skip the following steps.
- Search identical Minecraft version to your client on files.minecraftforge.net
- Download the latest version via the button 'installer
- The latest version is usually listed at the top as 'Download Latest
- Open the downloaded file (usually called
forge-VERSION-installer.jar) - Crucial difference: In the opened window you now select
install server- You have to set the path manually: For example, create a new folder on your desktop and set the path there.
- Confirm with
OK. Now the files for the Forge Server will be downloaded into the folder you have set
- If the installation was successful a new window appears with
Successfully downloaded minecraft server and installed forge.- In the created folder are now some files and folders
- Among them e.g. a
librariesfolder and several.jarfiles or one.bat/.shfile each. This can differ between the forge versions.
- Now you have prepared the files for the server. Now connect via FTP to your Minecraft server.
- Select the forge files/folders and upload them to your Minecraft server (e.g. by drag and drop)
- Restart your server (new) and check the console/logs if the server starts correctly
Finally install mods
After Forge is installed and both the client and server are now capable of handling mods, you can start picking out and installing your desired mods.
Search and download mods
- Most popular place for mods is curseforge.com
- Pick a mod that you want to install and download it
- For example: Biomes O' Plenty a server popular mod to generate new and unique biomes
- Usually mods consist of a
.jarfile
Install mods locally
- Now open locally on your computer your Minecraft installation directory
- The default paths to the directory we have listed for you below
- In the installation directory you will find a
modsfolder- Important: the
modsfolder will only be created if you have successfully started the client/forge profile once. Otherwise, check the Forge installation to see if it was unsuccessful.
- Important: the
- Copy the downloaded file into this folder
- Start your game (profile
forge) and check if the mod was loaded successfully
Install mods on server
- Connect via FTP to your server and open the
modsfolder- Important: The
modsfolder will only be created if the server has been started successfully once. Otherwise, check the Forge installation to see if it was unsuccessful
- Important: The
- Copy the downloaded mod into the
modsfolder on your server (e.g. by drag and drop) - Restart your server (new) and check if the mod was loaded successfully
- About this you always get useful information in the console or in the logs
Default installation directories
| Operating System | Path |
|---|---|
| Windows | (C:)\User\Name\AppData\Roaming\.minecraft\mods |
| Linux | ~/.minecraft/mods |
| Mac OS X | ~/Library/Application Support/minecraft/mods |
Windows 10 and Bedrock version
Mods are restricted in the Windows 10 or Bedrock version. You cannot install mods comparable to the Java version.
On this platform, mods are offered in the Marketplace, most of which must be purchased as well. Purchased mods are then activated in the game menu via the add-ons in already created worlds.